Thank you for taking my workshop: Write Your Draft Faster. I have gathered together examples, illustrations, templates and links mentioned in the workshop. I hope you find them as useful as I have in my quest to draft ever faster.
Setting Your End Goal
How long should my book be?
In a race, we know where the start is and how far we will be running. When we write a novel, we also have a starting point (the first sentence) and an ending point (the last sentence). The distance we have to go is the finished length of our draft.
The finished length will depend on what you are writing. A novella can be 15,000 to 30,000 words. A short novel 40,000-50,000. A genre novel 75,000 to 85,000. A long one 95,000-120,000. Set your word count by what is common in your genre to avoid writing too short or too long. Check other books and publisher requirements to be sure.
Setting Your Guideposts
Once you have your word count, you can divide your blank draft into sections. These can be scenes, chapters, or percentage of the story. It can even be all three.
Using Numbers
You can determine the number of chapters and the number of words in each chapter
You can mark percentages. Plot points usually occur as follows
10% Inciting incident. The protagonist is challenged in some way.
25% Point of No Return protagonist sets out on quest – in a romance the potential lovers are thrown together in some way
50% Midpoint Either a high, such as a success, kiss, or love scene. Or a low, such as a major failure or blowup
75% Pit of Despair or Black Hole. The protagonist fails and sees no way forward.
80% Awakes Protagonist realizes what is wrong about themselves and sets out to win.
85% Battle or Grand Gesture
95% Resolution Plot lines tie up
98% Epilogue Wrap up. In a romance a happily ever after, the HEA.
Using Story
Having a planned story ending will allow you to keep going forward in an orderly way and prevent you from going sideways off the track.
Now what that plan is, is up to you. It can be very simple or complex. There are many ways to create one. Here I will present several that I do myself in preparation for fast drafting. Pick and choose the one you feel will help you the most, or if you wish, come up with your own.
Tell a Story Outline
This is a great method for pantsers and people who don’t like to make detailed outlines. In this method, you write a brief 1-3 page summary of your imagined story. Think of it as telling your story to a friend. Make sure it has a beginning, a middle full of exciting events, and an end. If you are writing romance, the end is easy. The lovers end up happily together.
Then take each sentence of the story and paste it into your blank draft. Note: Using the Tell-A-Story method has the advantage in that you will have a summary on hand if you need to pitch the story before it is completed. This is the method I always use first.
Use a Plotting Outline or Beat Sheet – There are hundreds of plotting templates and beat sheets available on the web. These are more complex than the story outline above, but provide a strong safety net as you write. Here are links to a sampling of templates or search on “Plot Templates” to find one you like on the web.
https://evernote.com/blog/12-creative-writing-templates/ A collection of different methods plus some other handy templates
https://www.creativindie.com/plot-outline/ Simple and clear plot outline for an adventure
https://www.novel-software.com/genrestorytemplates A variety of templates for different genres
http://selfpublishingteam.com/6-writing-outline-templates-and-3-reasons-to-use-them/ More detailed plot templates
If you do search the web for a template, be sure to choose one that best fits your genre. A science fiction plot template will not work for a romance story, for example. Personally, I use a romance plotting template that I created myself based on Gwen Hayes book Romancing the Beat. I have attached my version. Feel free to use it.
Zara’s Romance Beat Sheet
| Plot Position | Beat | Description |
| ACT 1 SET UP 1-25% | World/ Premise/Intro to Character/Start Romance Arc | |
| #1 TRIGGER | H1 Introduction Hint of Love Wound | Slice of life with a hitch External goal stated (What they think they want) |
| H2 Introduction Hint of Love Wound | Slice of life with a hitch External goal stated (What they think they want) | |
| #2 COMFORT ZONE | Meet Cute | MEMORABLE! Sparks fly! Internal thought – Attractive! NOT FOR ME! External goal conflicts with internal heart wound |
| 1st No Way! | Argument against falling in love. Make it clear on page. | |
| Plot Point 1 #3 POINT OF NO RETURN 25% | Adhesion Plot Thrust | H&H are thrown together so they can’t get away from each other. STUCK! |
| ACT 2A 25-50% #4 STRUGGLE Falling in love | H&H unwilling to change Get close/step back When together they are better people/ getting to know and respect each other | |
| 2nd No Way | Restate on page why it is wrong for each – bit backstory I don’t’ believe in love/ don’t need love/don’t deserve love | |
| The Inkling | Make a hole in their wall intimate moment/good deed/tenderness/sexy moment/sharing/working together/kindness | |
| Deepening desire | Sensual/sexy – lingering gazes, visceral reactions, sweet moment KISS or HUG | |
| Maybe this will work | Sex scene or close intimacy -vulnerable to each other | |
| Plot Point 2 #5 REVELATION HIGH POINT-NEW INFO/EVENT=DECISION 50% mark | Yes | It is possible/ open heart/feels right/ feels perfect. Really high emotions |
| Act 2 B #6 BUILD UP TENSION | Retreat from Love | Hit them with thing closest to heart wound |
| Inkling of Doubt | Hit 1 H does something that doesn’t gibe/thoughtless H says in text what they fear & have to protect | |
| Deepening of Doubt | Hit 2 H does something hurtful | |
| Retreat Retreat | Hit 3 H does something unforgiveable | |
| W Major Rug Pull | Shields Up | Hit 4 H does whatever the other fears – Really happens H says I knew better than to — H |
| Plot Point 3 75% mark #7 FINAL SET BACK External Plot Black Moment | Break Up | Final Blow Out Hs must choose between love and fear/heart wound and choose fear |
| ACT 3 75% AFTERMATH | Fighting for Love | Realize they made mistake. Claw way back |
| Dark Night of the Soul | Rock bottom Trapped/believe other dead/told self is idiot | |
| 80%-95% # 8 MOMENT OF TRUTH | Wake Up/Catharsis | Clouds clear. Know what to do to destroy fear/misconception/ Choose love over fear Must go out on a limb. Woo. Might be too late |
| Plot Point 4 #9 THE BATTLE 95% mark | Grand Gesture | Put everything on the line Life or death career/pride/goals/dream Race/ticking clock/obstacles/facing fear |
| ACT 4 RESOLUTION 95%-100% | ||
| Mirror Image | Show whole-hearted Mirror something from the opening of book | |
| Epilogue – Optional | Wrap up. Set up next book. Should not be boring. | |
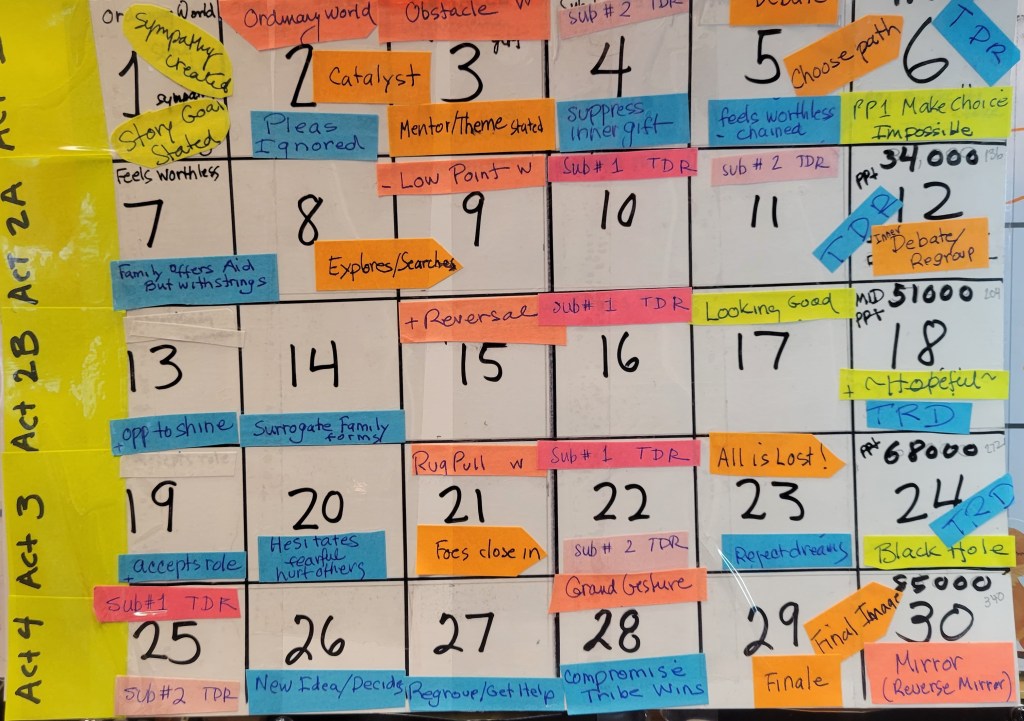
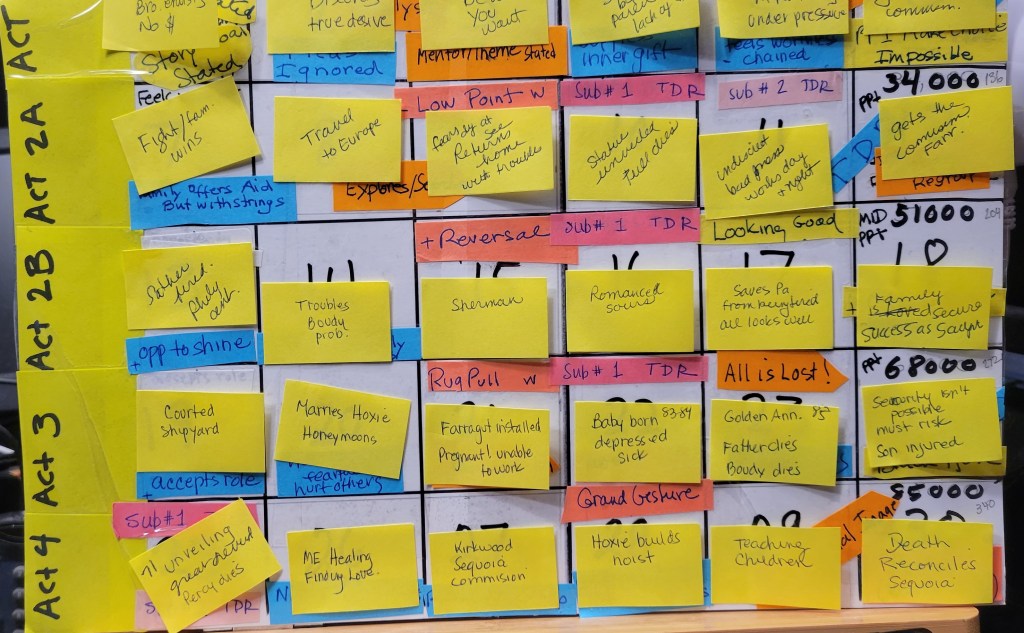
Create a Story Board
This is great for visual people or pantsers and is quick and easy to make. Take a sheet of typing paper. Divide it into 4 horizontal rows. Use small sticky notes and put 5 in each row. You can also just divide the rows into 5 columns and write in the boxes, but the sticky notes allow you to change events around.
I have outlined how to do it here, but a picture is worth a thousand words. Note: I have attached several examples.
Directions for a Visual Plotter
- Fold a sheet of typing paper into 4 sections. Put 5 sticky notes in each row.
- Label the top Row ACT 1
- Act 1, Box 1 is your ordinary world scene.
- Act 1 Box 2 is the inciting incident (or in romance The Cute Meet).
- Act 1 Box 3-4 are events leading to something happening to the character
- Act 1 Box 5 is Plot Point 1 – Major Change in Character’s Life.
- Label the second row Act 2a
- Act 2a Box 1-4 are events that happen as the characters try to reach their goals
- Act 2a Box 5 is Plot Point 2 – the High Point of the Story where it looks like all will go great for the main character.
- Label the third row Act 2b
- Act 2b Box 1-4 are events where things start to get harder for the character.
- Act 2 b Box 5 is Plot Point 3 where everything goes wrong.
- Label the fourth row Act 3
- Act 3 Box 1 is the Black Hole or Moment where the character is close to giving up.
- Act 3 Box 2 Is where the character takes action to get out of the black hole. In a love story, this is usually the grand gesture.
- Act 3 Box 3 is the fight or battle
- Act 3 Box 4 is the Climax where the character wins.
- Act 3 Box 5 is the Resolution or Epilogue.
Once you have an arrangement of events you like, type each item on the sticky notes into your blank draft.

Preparing to Draft
1. Mental Preparation
A racer focuses only on the race. The night before they visualize that race in their mind over and over. While you are in fast draft mode, you should try to do the same.
The night before, instead of reading a book, close your eyes and tell yourself the next part of your story. Imagine it as vividly as you can. Then sleep on it. During sleep, your brain will be working on this story so you will be more ready to write.
You can also visualize your story while driving to and from work or while eating lunch or dinner. As you imagine, play out different scenarios, visualize the setting, picture yourself as the character moving in that setting.
Don’t worry if you do not remember any of this when your writing time comes around. The point is your brain will subconsciously process the scene, and when you sit down to fast draft, the ideas will flow more effortlessly.
Note: While I firmly believe that writers need to read, read, and read some more, during fast drafting, I advise you to avoid reading at all. It is too easy to compare your work to the published material you are reading and get discouraged. Besides, during the drafting process it is better to focus all your free time on actually writing. So, save up all those books to read as a reward when your draft is done.
2. Eliminate Distractions
Make sure your computer area is free of distractions. As much as possible, clear away anything around your computer that reminds you of a task you have to do. Only have things that relax you or are related to what you are writing. Move everything out of sight except the computer, a notepad, your outline, and a pen. If you want to add something pretty to give ambience, that is fine. But remove anything that would cause stress.
Alternatively, you can move the computer to a spot where all you will do is fast draft and nothing else.
If you would like to see how I cleaned up my writing area, check out this blog post. https://www.zarawestsuspense.com/organize-and-de-clutter-your-writing-zone/
Make Yourself Comfortable – Cozy chair, comfy clothes, music or whatever you need to relax. If it is noisy, consider noise-canceling earphones.
Block Out Notifications – I personally have all notifications turned off on my computer and on my phone all the time. I have a busy life so I check these on my own schedule. You can also make your writing page full screen or use WriteRoom (Mac) or q10 (PC) . Scrivener and similar writing applications can also be used to provide an enclosed writing environment.
Inform Others – Tell your family and friends not to interrupt you during the time you have chosen to fast draft. Consider this to be like a class you are going to. You are not home. If needed make a sign to put on the door.
Writing this draft is not going to last forever. Promise to spend time with family and friends as soon as it is done.
Here are some other good ideas.
Timers, Trackers, and Progress Bars
If you were running a race, you would time yourself and check how close you are to the finish line. Fast Drafting also works best when you time yourself and track your progress. The daily visible record of the words you have written gives immediate self-feedback that you are making progress to your goal.
Timers
There are numerous ways to time yourself while writing. You can use a simple mechanical kitchen timer. You can use the timer app on a cell phone. You can use a digital timer on your computer. The goal is to make sure you sit in front of your computer for the time you have chosen, and you write without distraction.
Here are some free timer apps
Hourglass – subtle appearance. Download onto your computer. It can be left visible on the screen or hidden. https://chris.dziemborowicz.com/apps/hourglass/
Cool Timer – Bare-bones and ugly, but it works and it’s free. Download on your computer. It can be visible on your screen as you write or hidden. http://www.harmonyhollow.net/cool_timer.shtml
Pomodoro method timers – Here is an explanation of the technique and several recommended timers. https://zapier.com/blog/best-pomodoro-apps/
Tomato Timer A quick, easy online pomodoro type timer. https://tomato-timer.com
Word Trackers
Once you have your timer set up, the next thing to do is set up a word tracker. The purpose in doing this is to keep you motivated. Just seeing the words add up is exhilarating. Also, you will see days when you come under your planned words and days that go over so can you adjust you speed accordingly.
The simplest way to track your words is write them on a page in a notebook. However, there are some clever writing trackers that do so much more. You start by entering your ending date. Then each day you enter your day’s total. The programs will then do the math for you, readjusting how many words you need to write the next day.
There are a wide range of programs you can choose from.
One of the things I like about NaNoWri is their great word count tracker. It gives a very visual picture of your progress and also adjust automatically to keep you on track. Now I know that you can make your own tracker using Excel. Been there. Done that.
[Here is a tutorial if you want to try it yourself].
Excel Spreadsheets
If you have a basic understanding of Excel, but don’t like creating your own formulas, then you will enjoy Svenja Goslen’s beautiful Excel spreadsheets that track daily progress either for a month nanowrimo-word-tracker-spreadsheets or for a year yearly-word-tracker-spreadsheets/
Progress Meters
These are simple bar or line charts [technically picometers] that show your progress toward the number of words you set. Most are in the form of a widget to embed in a blog or website. Some require more customization than others.
You can check these out here.
ProgPress [exclusively for wordpress]
Word Tracker Apps
Word Tracker is an App for the iPhone that is both a timer and a word tracker. I don’t have an iPhone so if you do, please feel free to comment of how this one works..
NOTE: A trick I use to be sure to record my totals is to paste the link to my chart in the header of my WIP. That makes it easy to click it open at the end of the writing session and quickly record my daily total.
Speedbump Flatteners
SPEED BUMP 1 Stuck on Plot? –
Tip 1. Brainstorm six or more possible things that could happen next. Then decide which one is the most unusual or mysterious or threatening, or choose the one that is the best fit for your character and will help them reach their scene goal as well as take them closer to the ending. Choose that one and write on.
Tip 2. Picture the paragraph/scene/chapter action in your head. If you haven’t written out the character’s goal, motivation, conflicts to be faced, and the decision to be made, do so now on your pad You can do this even on the page or paragraph level. Include the page number so you can review it during revision if needed
Tip 3. You can also use the W-Plot method outlined below in SPEED BUMP 13.
SPEED BUMP 2 Stuck on Tension? – Add something or someone that will hurt the character or will block the character from reaching their goal in the scene. Try brainstorming six things that will knock your character off course. Choose the least expected or least commonly used.
SPEED BUMP 3 Losing Focus? – Picture your hero/villain at the end of your scene/chapter/or novel – what do they have to do or have happen to them to get there?
SPEED BUMP 4 Stuck on a Fact? – In general, you should have a pretty good overview of your setting, time frame, and historical events before you begin writing. When you don’t know the answer, leave a blank or make a guess and then use the highlighter tool to highlight it to remind you to come back and add that fact.
SPEED BUMP 5 Stuck on POV? – Write two versions in two or more different characters, POV. Keep both in your WIP and move on.
SPEED BUMP 6 Not sure you want to keep something? Highlight it and move on.
SPEED BUMP 7 Needs more work? – Can’t get the words to sound beautiful? Know you need to add more sensory details? Highlight and move on.
SPEED BUMP 8 Don’t know a story detail? – By story detail, I mean things like character’s names, car models, addresses, eye color. Things you are going to mention several times in the book. Highlight and move on.
SPEED BUMP 9 Written something great, but it doesn’t fit where it is? – Cut it and paste it at the end of your draft. That way you don’t lose credit for the word count, but it is not blocking the progress of the draft. I suggest highlighting it as well so it is clearly an extra bit. If you happen to find a spot to stick in as you write further, then do so. Otherwise, wait for the revision process to deal with it.
SPEED BUMP 10 Oops, there’s something that needs to be added into what is already written? Don’t stop writing. Make a note on your pad to remind you to look it up, highlight it and move on.
SPEED BUMP 11 Stuck on a start of a scene or chapter? Write a place holder sentence that simply states who, where and when at the start of a difficult scene or chapter to be revised later. Highlight it to come back to during revision.
SPEED BUMP 12 Mind Gone Blank? – You’re stuck. The words won’t come. You write a sentence. Erase a sentence. You know what you want to say, but you can’t wrap your mind around saying it. Or worst of all, you have a great idea, but you sit down to write, and it’s gone. Poof! Sound familiar? Try one of these.
Tip 1: Skip it. This one is the easiest. Mark the spot (the color highlighter tool works well) and skip forward in the story to a point that you can write about. I also make a note in my notebook to go back to that spot when I revise. I find this technique is most helpful when I am starting a new scene and can’t quite get the transition right, when I can’t make a sentence say what I want, or when I can’t think of the right word.
Tip 2: Make a change. Change the POV character and/or change the tense. I write mostly in third person, past. But when writing introspection, I find first person, present lets me get deeper into the character’s head. So if inner thought is where I get stuck, I change it up. Later during revision, I can fix the tenses. Why it works? Sometimes the reason writing isn’t flowing is you are telling the story through the wrong character. Changing the viewpoint can give you a new perspective and break the block.
Tip 3: Get inside someone else’s head. Pick a character who is having an emotional moment at that point. It doesn’t have to the POV character. Using first person, get inside his/her mind and write a rant from that character’s perspective. Just write, write, write until you have exhausted all emotion. Stop. Highlight it and you should be ready to move on with your scene. Why it works. Writing emotion gets your creative juices flowing.
Tip 4: Make a Mind Map. Nothing fancy. On your pad, write the event you are stuck on in the center. Draw at least six lines radiating outward. at the end of each, write a possible reaction by the character. Then draw six lines out showing what would happen or result if the character did that. Come up with six results. Now look back and choose the action-reaction-result combination that is most unexpected or best fits your story.
SPEED BUMP 13 Plot is Off Course? You are starting a new scene, but it’s meandering all over the place, or you feel you aren’t making progress. Use what I call the W-method for scene development. (Note: I learned this method from Karen Doctor. You can buy copies of her workshop notes here.).
On your pad of paper, hand draw a large W. At the left tip of the W write where the scene starts. Midway down the left leg brainstorm some annoying things that might happen. At the bottom, brainstorm some possible low points for the character. On the middle up leg, brainstorm some things that might change it for the better. At the top of the mid-stroke, brainstorm great things that might happen.
Now we go back down. Think of some horrible things that might happen to spoil that good feeling. At the right bottom, brainstorm the absolute worst things. On the right hand up stroke have the character make a decision as to how to fix things. Make it the wrong decision.
If this is too hard to understand, I posted a visual here. https://www.zarawestsuspense.com/w-plot-your-scene/
The W-plot is most often used for plotting a novel. But I find it much better for scene work.
The trick to making it work during fast drafting is to do it on paper and brainstorm – let yourself think wild thoughts. I find it really helps me put conflict into my writing. It also sets up the dilemma at the end of the scene. The character has a reason to make a decision (especially if the choice is a bad one) which hooks to the next chapter.
It’s like thinking of our story as waves rising and cresting – to get a bit poetic about it.
Smart Sprinting
Sprint Tip 1: Limit the Focus
Consider choosing a limited focus for the sprint rather than an entire scene.
Write Description. Write a setting or character description, a conversation, or a dark moment or a moment of awe. You may end up writing more than you need for that place in the story. But hopefully later, you will find you can sprinkle the rest into other locations.
Write Deep Into A Character. You can also take a character who is giving you trouble and write a rant or emotional outburst. This worked best if you write it in first-person present. If you decide to use this later, the tense can be changed during revision.
Write Action. Sprinting is ideal for capturing chase scenes and fight scenes or any moment of fast-paced action. These type of scenes call for short and incomplete sentences and plenty of emotion. Sprinting will help you achieve that.
Sprint Tip 2 Vary The Length Of Your Sprints.
Short 5- to 15-minute sprints can be just as effective as longer 30-to 60-minute ones. The shorter sprints can be easily fit into a busy day. If you write 400 words in 10 minutes, and you write 10 times in a day that equals 4000 words!
Shorter sprints can be focused in on a setting description or fast-paced scene as mentioned in Tip 1. Use longer sprints to get into the flow in a way the short ones can’t. Longer sprints are ideal for working on a sex scene or a long inner monologue.
Sprint Tip 3 Use a Blank Page
When sprinting, I suggest opening up a blank page and writing there. Do not sprint in your actual manuscript. When done, you can paste it into your draft where it should go or stick it at the end of the draft highlighted in your chosen color to insert during revision.
If you want more Draft Faster tips, consider purchasing my guidebook: Fast Draft Your Manuscript and Get It Done Now.

